


使用KubeKey安装Kubernetes集群
1374 字
7 分钟
使用KubeKey安装Kubernetes集群
创建主机
| 主机IP | 主机名称 | 角色 |
|---|---|---|
| 10.168.1.20 | master | master, etcd |
| 10.168.1.21 | node1 | worker |
| 10.168.1.22 | node2 | worker |
| 10.168.1.23 | node3 | worker |
| 10.168.1.100 | nfs | nfs-server |
创建NFS持久化存储服务器
关闭防火墙
systemctl stop firewalld.servicesystemctl disable firewalld.service安装nfs
yum -y install nfs-utils rpcbind配置共享目录
mkdir -p /opt/nfschmod 755 /opt/nfs配置nfs
nfs 的默认配置文件在 /etc/exports 文件下,在该文件中添加下面的配置信息
vim /etc/exports/opt/nfs 10.168.1.0/24(rw,sync,no_root_squash)配置说明:
/opt/nfs:是共享的数据目录- *:表示任何人都有权限连接,当然也可以是一个网段,一个 IP,也可以是域名 这里写10.168.1.0/24 我的内网网段
- rw:读写的权限
- sync:表示文件同时写入硬盘和内存
- no_root_squash:当登录 NFS 主机使用共享目录的使用者是 root 时,其权限将被转换成为匿名使用者,通常它的 UID 与 GID,都会变成 nobody 身份
启动服务
nfs 需要向 rpc 注册,rpc 一旦重启了,注册的文件都会丢失,向他注册的服务都需要重启 注意启动顺序,先启动 rpcbind
启动rpcbind服务
systemctl start rpcbind.servicesystemctl enable rpcbindsystemctl status rpcbind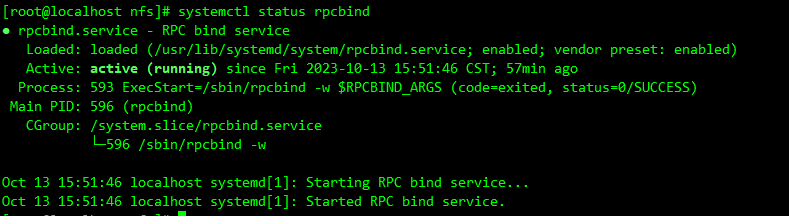
看到上面的 active 证明启动成功了
启动nfs服务
systemctl start nfs.servicesystemctl enable nfssystemctl status nfs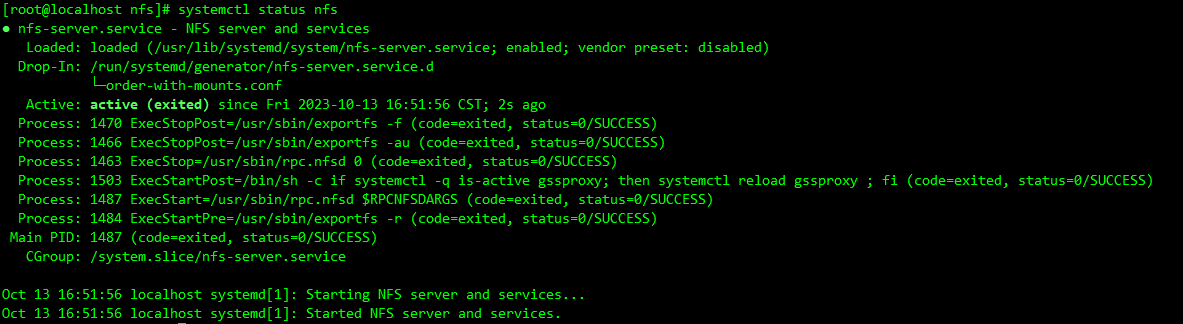
看到上面的 active 证明启动成功了
查看目录挂载权限
cat /var/lib/nfs/etab
在各个节点安装nfs客户端
关闭防火墙
systemctl stop firewalld.servicesystemctl disable firewalld.service安装nfs
yum -y install nfs-utils rpcbind启动服务
nfs 需要向 rpc 注册,rpc 一旦重启了,注册的文件都会丢失,向他注册的服务都需要重启 注意启动顺序,先启动 rpcbind
启动rpcbind服务
systemctl start rpcbind.servicesystemctl enable rpcbindsystemctl status rpcbind看到上面的 active 证明启动成功了
启动nfs服务
systemctl start nfs.servicesystemctl enable nfssystemctl status nfs看到上面的 active 证明启动成功了
挂载数据目录
showmount -e 10.168.1.100
创建nfs存储配置文件
vim nfs-client.yamlnfs: server: "10.168.1.100" # This is the server IP address. Replace it with your own. path: "/opt/nfs" # Replace the exported directory with your own.storageClass: defaultClass: false下载KubeKey
# 国内最好使用国内镜像 能访问GitHub和Googleapis则不需要执行`export KKZONE=cn`这条命令export KKZONE=cn
# 下载最新稳定版本的KubeKeycurl -sfL https://get-kk.kubesphere.io | sh -
# 如果要下载指定版本的KubeKey 则通过VERSION执行版本 例如下载v3.1.0-alpha.5版本的KubeKey# kubernetes版本过新的话需要使用最新开发版 去https://github.com/kubesphere/kubekey/releases里找# 不然会出现 No SHA256 found for kubeadm. v1.26.9 is not supported 类似的错误curl -sfL https://get-kk.kubesphere.io | VERSION=v3.1.0-alpha.5 sh -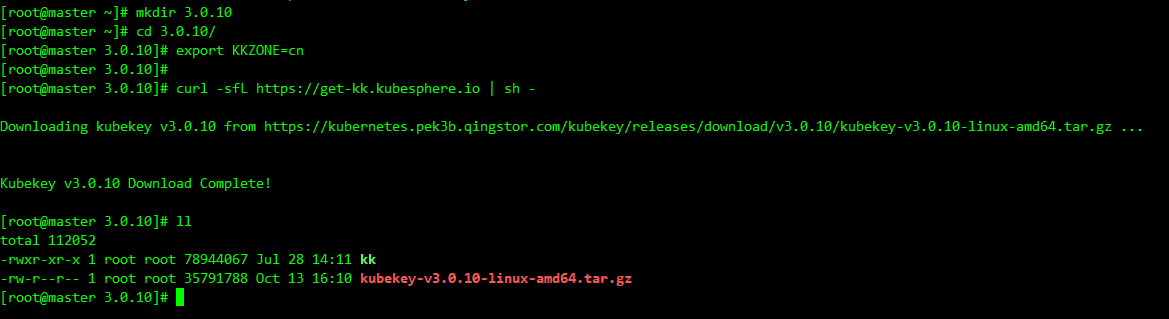
安装Kubernetes和KubeSphere
给kk添加可执行权限
chmod +x kk创建配置文件
./kk create config --with-kubernetes v1.23.10 --with-kubesphere v3.3.2如果不指定配置文静名称 默认为config-sample.yaml
备注
- 安装 KubeSphere 3.4 的建议 Kubernetes 版本:v1.20.x、v1.21.x、_ v1.22.x、_ v1.23.x、_ v1.24.x、_ v1.25.x 和 * v1.26.x。带星号的版本可能出现边缘节点部分功能不可用的情况。因此,如需使用边缘节点,推荐安装 v1.21.x。如果不指定 Kubernetes 版本,KubeKey 将默认安装 Kubernetes v1.23.10。有关受支持的 Kubernetes 版本的更多信息,请参见支持矩阵。
- 如果您在这一步的命令中不添加标志
--with-kubesphere,则不会部署 KubeSphere,只能使用配置文件中的addons字段安装,或者在您后续使用./kk create cluster命令时再次添加这个标志。 - 如果您添加标志
--with-kubesphere时不指定 KubeSphere 版本,则会安装最新版本的 KubeSphere。
编辑配置文件
vim config-sample.yamlapiVersion: kubekey.kubesphere.io/v1alpha2kind: Clustermetadata: name: samplespec: hosts: - { name: master, address: 10.168.1.20, internalAddress: 10.168.1.20, user: root, password: "root", } - { name: node1, address: 10.168.1.21, internalAddress: 10.168.1.21, user: root, password: "root", } - { name: node2, address: 10.168.1.22, internalAddress: 10.168.1.22, user: root, password: "root", } - { name: node3, address: 10.168.1.23, internalAddress: 10.168.1.23, user: root, password: "root", } roleGroups: etcd: - master control-plane: - master worker: - node1 - node2 - node3 controlPlaneEndpoint: ## Internal loadbalancer for apiservers # internalLoadbalancer: haproxy
domain: lb.kubesphere.local address: "" port: 6443 kubernetes: version: v1.23.10 clusterName: cluster.local autoRenewCerts: true containerManager: containerd etcd: type: kubekey network: plugin: calico kubePodsCIDR: 10.233.64.0/18 kubeServiceCIDR: 10.233.0.0/18 ## multus support. https://github.com/k8snetworkplumbingwg/multus-cni multusCNI: enabled: false registry: privateRegistry: "" namespaceOverride: "" registryMirrors: [] insecureRegistries: [] addons: - name: nfs-client namespace: kube-system sources: chart: name: nfs-client-provisioner repo: https://charts.kubesphere.io/main valuesFile: /root/nfs-client.yaml
---apiVersion: installer.kubesphere.io/v1alpha1kind: ClusterConfigurationmetadata: name: ks-installer namespace: kubesphere-system labels: version: v3.3.2spec: persistence: storageClass: "" authentication: jwtSecret: "" zone: "" local_registry: "" namespace_override: "" # dev_tag: "" etcd: monitoring: false endpointIps: localhost port: 2379 tlsEnable: true common: core: console: enableMultiLogin: true port: 30880 type: NodePort # apiserver: # resources: {} # controllerManager: # resources: {} redis: enabled: false volumeSize: 2Gi openldap: enabled: false volumeSize: 2Gi minio: volumeSize: 20Gi monitoring: # type: external endpoint: http://prometheus-operated.kubesphere-monitoring-system.svc:9090 GPUMonitoring: enabled: false gpu: kinds: - resourceName: "nvidia.com/gpu" resourceType: "GPU" default: true es: # master: # volumeSize: 4Gi # replicas: 1 # resources: {} # data: # volumeSize: 20Gi # replicas: 1 # resources: {} logMaxAge: 7 elkPrefix: logstash basicAuth: enabled: false username: "" password: "" externalElasticsearchHost: "" externalElasticsearchPort: "" alerting: enabled: false # thanosruler: # replicas: 1 # resources: {} auditing: enabled: false # operator: # resources: {} # webhook: # resources: {} devops: enabled: false # resources: {} jenkinsMemoryLim: 8Gi jenkinsMemoryReq: 4Gi jenkinsVolumeSize: 8Gi events: enabled: false # operator: # resources: {} # exporter: # resources: {} # ruler: # enabled: true # replicas: 2 # resources: {} logging: enabled: false logsidecar: enabled: true replicas: 2 # resources: {} metrics_server: enabled: false monitoring: storageClass: "" node_exporter: port: 9100 # resources: {} # kube_rbac_proxy: # resources: {} # kube_state_metrics: # resources: {} # prometheus: # replicas: 1 # volumeSize: 20Gi # resources: {} # operator: # resources: {} # alertmanager: # replicas: 1 # resources: {} # notification_manager: # resources: {} # operator: # resources: {} # proxy: # resources: {} gpu: nvidia_dcgm_exporter: enabled: false # resources: {} multicluster: clusterRole: none network: networkpolicy: enabled: false ippool: type: none topology: type: none openpitrix: store: enabled: false servicemesh: enabled: false istio: components: ingressGateways: - name: istio-ingressgateway enabled: false cni: enabled: false edgeruntime: enabled: false kubeedge: enabled: false cloudCore: cloudHub: advertiseAddress: - "" service: cloudhubNodePort: "30000" cloudhubQuicNodePort: "30001" cloudhubHttpsNodePort: "30002" cloudstreamNodePort: "30003" tunnelNodePort: "30004" # resources: {} # hostNetWork: false iptables-manager: enabled: true mode: "external" # resources: {} # edgeService: # resources: {} terminal: timeout: 600安装
./kk create cluster -f config-sample.yaml安装日志查看
kubectl logs -n kubesphere-system $(kubectl get pod -n kubesphere-system -l 'app in (ks-install, ks-installer)' -o jsonpath='{.items[0].metadata.name}') -f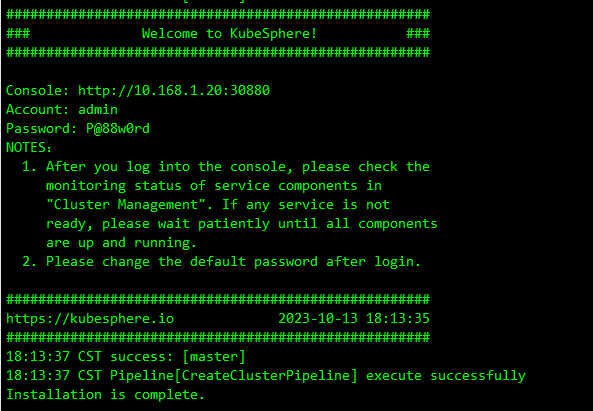
到这里安装完成
文章分享
如果这篇文章对你有帮助,欢迎分享给更多人!
使用KubeKey安装Kubernetes集群
https://tianch.com.cn/posts/tutorials/shi-yong-kuberkey-an-zhuang-kubernetes-ji-qun/相关文章智能推荐
1
在Kubernetes集群上创建第一个容器化应用
KubernetesKubernetes 集群已经搭建成功了,现在就可以在集群里面来跑应用了。要在集群里面运行应用,首先需要知道几个概念。
2
Kubernetes-LocalDNS
Kubernetes在 iptables 模式下(默认情况下),每个服务的 kube-proxy 在主机网络名称空间的 nat 表中创建一些 iptables 规则。
3
Kubernetes-Prometheus
KubernetesPrometheus 最初是 SoundCloud 构建的开源系统监控和报警工具,是一个独立的开源项目,于 2016 年加入了 CNCF 基金会,作为继 Kubernetes 之后的第二个托管项目。Prometheus 相比于其他传统监控工
4
Kubernetes-NFS
Kubernetesnfs 的默认配置文件在 /etc/exports 文件下,在该文件中添加下面的配置信息
5
Kubernetes-Ingress
Kubernetes前面学习了在 Kubernetes 集群内部使用 kube-dns 实现服务发现的功能,那么部署在 Kubernetes 集群中的应用如何暴露给外部的用户使用呢?可以使用 NodePort 和 LoadBlancer 类型的 Service
随机文章随机推荐
文章
115
分类
8
标签
35
总字数
216,150
运行时长
0 天
最后活动
0 天前
站点域名tianch.com.cn
Fireflyv6.15.6
Astrov7.1.3
Nodev22.16.0
pnpmunknown
构建时间2026年8月14日 19:33:58
系统信息Linux / x86_64